

")


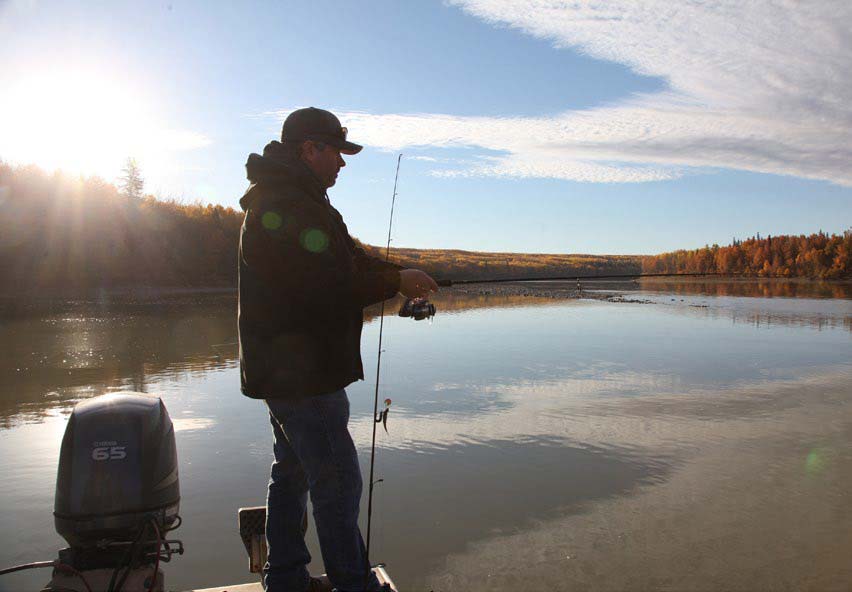
Your fly-fishing system consists of numerous parts. Backing, fly line, leader, and tippet all form a critical piece in a tapered fly line system and are joined together by knots or loops to form a single strand that connects you to the fish. If one of these parts fails or if one knot fails, the entire system fails, and you lose the fish and perhaps much more. Let’s jump in and start assembling these essential fly-fishing knots in a way that ensures that they don’t come disconnected at the wrong time.
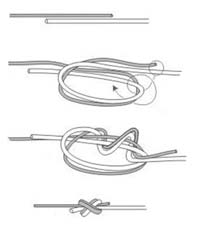
The Nail/Tube Knot:
There are three tried and true ways to join anything to either end of your fly line. The nail/tube knot is very well known and has been used for many decades to do this. It takes some practice to get the knot right but it’s very strong when joining your backing to a fly line that has a strong core. If your fly line does not have a centre core (like some clear lines) then do not use this knot, use a whipped loop or leader loop instead.

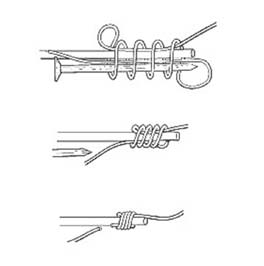
To tie the nail/tube knot:
- Cut a tube of a diameter slightly greater than your backing, about five centimetres in length. The hollow plastic Q-Tip tube works well.
- Place five to eight centimetres of fly line in the opposite direction to about eight to ten centimetres of backing and place the tube between the two lengths so that all three overlap.
- Grip all three between the thumb and forefinger of your left hand, with the tip of the fly line and the tube sticking out about five centimetres past your fingertips.
- Take the loose end of the backing in your right hand and make five wraps around the tube and the fly line towards the tip of the fly line and tube.
- Slide your left-hand thumb and forefinger forward to pinch the wraps so they don’t unravel.
- Take the loose end of the backing in your right thumb and forefinger and pass it through the tube towards the butt end of the fly line, all the way until it comes out the other end of the tube and you cannot pass any more through.
- Slide the tube out of the wraps (towards the fly line tip) and set it aside, never letting go of the wraps.
- Now, still pinching the wraps, poll on the tag end of the backing with your right hand until the wraps start to cinch down on the fly line. Don’t cinch down yet, just snug the knot a bit so the wraps can’t come loose.
- Check the wraps to make sure they don’t overlap and then, making sure the fly line does not slip out of the wraps, poll on the opposite ends of the backing to really cinch it into the fly line coating.
- Trim the tag end of the fly line and the tag end of the backing off.
The Braided Leader Loop:
I personally have used braided leader loops for years to join the ends of my fly line to the rest of my system. Make sure each time you go fishing to check it to make sure it is not slipping. If it is, put on a new one.
The Whipped Loop:

Tying a whipped loop in the end of your fly line is simple and produces a permanent secure loop. You’ll need a flytying bobbin and some monocord tying thread along with some head cement or Krazy glue.
- Start by tapering the very tip of your fly line at about a sixty-degree angle. This will allow a smooth transition from double to single thickness when you wrap the thread over the joint.
- Form a loop of about two centimetres in the end by folding the tag end over to meet the standing line. You shoold have about one centimetre of length where the two lines are now parallel to each other. This is what you will wrap over with your thread.
- Wrap the end of your thread four or five times around these two lines.
- Pinch the wraps and the loop in one hand to hold them and hold the standing line in the other hand. This will leave the bobbin hanging free.
- Start spinning the bobbin around the doubled over line, working it down and over the tapered tip and onto the single standing line for about one half a centimetre, then work your way back again making a smooth transition over the angled tip.
- Secure it all by whip finishing the thread off.
- Slide a nail into the loop and poll hard on the loop to see if it holds. If it starts to slip, start over and wrap your thread tighter around the line as you spin the bobbin.
- Finish the process by coating the wraps with the head cement or Krazy glue.
The Surgeon’s Loop:

If you decide to tie lops at the ends of your fly line, you’ll have to tie a loop in the end of your backing and another at the butt end of your leader so that you can join them to your fly line, loop to loop. My preferred loop for monofilament or backing is the surgeon’s loop.
- Double over ten centimetres of leader butt or backing, whichever is the case.
- Make an overhand knot passing the loop end through.
- Pass it through again.
- Lubricate it with saliva and poll tight.
- Trim tag end.
There are lots of knots that you can use to join the leader to the tippet, but I prefer one above all the rest: the surgeon’s knot.
Fly Fishing: Backing, Leaders And Tippets – All You Need to Know
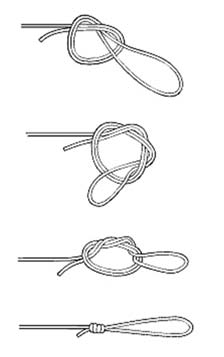
The Surgeon’s Knot:
The surgeon’s knot is simply a double overhand knot. One key restriction about this knot is that one of the strands you are joining together must have both ends free so that the entire length can pass through the loop as the knot is being tied.
-
Surgeon’s Knot Lay out the butt end of the tippet and the tip of the leader in opposite directions, overlapping them by about eight to ten centimetres.
- Using both overlapping sections as one line, tie a simple overhand knot in the overlapped section, making sure that both the short end (leader tip) and long end (entire tippet) are polled completely through.
- Now repeat the process again, passing the short end (leader tip) and long end (entire tippet) through the same opening a second time making certain both ends are polled all the way through.
- Finally, moisten the wraps with saliva and draw the knot tight by gripping both strand on either side of the knot, and drawing down with steady pressure.
- Trim the tag ends close to the wraps, leaving a tiny bit in case of a bit of slippage.

Tying your backing to the arbour of your reel is simple but actually quite crucial. If this knot slips you lose everything. It’s the last stop if you get spooled by a fish. The knot to use here is, logically enough, called the arbour knot.

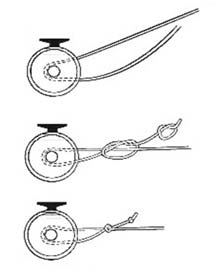
The Arbour Knot:
- Start by tying a simple overhand knot at the very end of your backing. Trim the tag end now but leave a short bit of tag so there is no chance of this little knot coming apart.
- Wrap the butt end of the backing around the arbour of the spool and tie another overhand knot using the same end of the backing that you tied the first knot in, but as you tie this knot you form the loop around the standing line of the backing.
- Cinch the second loop onto the standing line of the backing.
- Poll on the standing line of the backing past the loop you just cinched down so that the second overhand knot slides down the standing line and against the arbour.
- Keep polling on the standing line, working it backing back and forth, forcing the first knot down toward the second until it butts up against it.
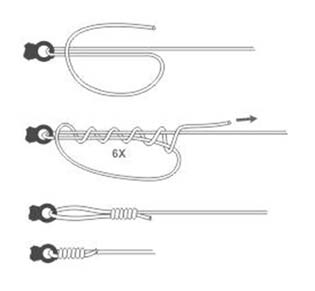
Finally, we need to tie our fly onto our tippet. I have found two knots to be usefol here, one is easier to tie, but the other is stronger. The improved clinch knot is a well-known and well used knot to do this. The Uni or hangman’s knot is the other one; it’s not as well-known but is definitely stronger.
The Improved Clinch Knot:
- Run the tag end of the tippet through the eye of the hook and poll six to eight centimetres through the hook eye.
- Wrap the tag end around the standing line five times.
- Pass the tag end through the loop you just made next to the hook eye. When you do this, you form another loop that includes your wraps.
- Pass the tag end through that second loop.
- Wet everything with some saliva to lubricate the knot.
- Hold the tag end in your teeth, the standing end in one hand and the bend of the hook in the other and poll the fly and standing line in opposite directions. The knot will cinch down and slide down against the eye of the hook.
- Clip the tag end so a tiny tag is still left.


The Uni-knot:

The Uni-knot is also known as the hangman’s knot or Duncan knot. I was introduced to this knot at an outdoors show. I was at a booth that was testing knot strength and somebody tied and tested one of these knots on the machine. It outlasted any other terminal knot that was tested tied in the same pound-test monofilament. The other advantage to this knot is that with the way it cinches down on the standing line you can leave a tiny loop at the end instead of snugging it down tight to the eye of the hook and this allows the fly to swim freely. I really like this knot, but it can be hard to tie with cold fingers.
- Run the tag end of the tippet through the eye of hook and double it back parallel to the standing line.
- Make a loop in the tag end by laying the tag end over the doubled line.
- Wrap the tag end around the doubled line five or six times, passing each wrap through the loop.
- Moisten the lines with saliva and poll tag end to snug up the turns.
- Poll the standing line to slide the knot down against the eye of the hook.
- Trim the tag end.
Learning to tie these essential fly fishing knots can be frustrating, but repetition and practice will result in good ones. I get a strange sense of accomplishment and satisfaction when I land a big, tough fish that has run me well into my backing because my knots have held up to the test when it really counted. Pay attention to your knots and they won’t fail you when the time comes to put them to the test.
By Bill Luscombe


