Gun Restoration: The Action and Metal Components (Part I)
Gun restoration isn’t just about making an old rifle or shotgun look pretty again—it’s about honoring the stories, hunts, and memories that firearm carries. Whether you’ve neglected a trusted field gun over a long, wet season or inherited a beat-up classic with more rust than blue, the good news is that most of this damage can be reversed with some patience, the right materials, and a methodical approach.
In this two-part guide to gun restoration, we’ll start with the parts that matter most to safety and function: the action, barrel, and other metal components. You’ll learn how to assess rust and pitting, when to call in a gunsmith, and how to clean, cold blue, or professionally refinish your firearm’s metal surfaces. Then we’ll move on to the wood, walking through stripping old varnish, raising dents, sanding, and choosing between an oil or polyurethane finish so your stock looks as good as the metal it supports. Follow along and you can turn that tired old “Betsy” back into a reliable, good-looking hunting partner for many more years in the field.
Gun Restoration Starts with a Little Neglect After Being in the Field

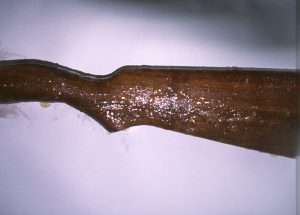
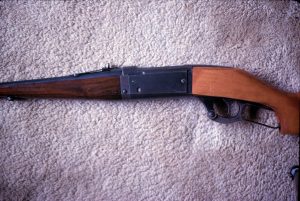
Or perhaps you’ve been gifted an old firearm, or inherited one, that’s in rough shape. The barrel and action are rusted and/or the bluing has worn off, and the stock is beat up or peeling and stained. If you have a firearm in this condition, more often than not it is an older gun (new guns get babied as you may well know) and the stock could use a bit of sprucing up in addition to the metal components. Since you are going to have to invest time and effort refurbishing the action and barrel you might as well go whole hog and do the old girl proud by giving the stock a face-lift as well. This sounds like a lot of work but in fact it isn’t, it just takes a bit of time and patience.
Starting Gun Restoration With the Metal Components
You should start with the metal parts first, as they will continue to degrade if neglected further. Disassemble the firearm down to its bare components and carefully examine each piece internally and externally looking for rust. If you are lucky the bore, action and magazine will be rust-free. If you find anything more than superficial rust in the bore you should take the barrel into a good gunsmith to have it cleaned. They will be able to tell you just how bad it is and whether the barrel can be saved or not. If the bore is still in good shape, clean it and the action as you would normally and then check the outer surfaces for rust and pitting; minor pitting can be hard to detect before you remove the surface rust.
Removing Surface Rust During Gun Restoration
To treat the external surfaces of the parts, find some light oil (sewing oil or light gun oil) and some extra-fine (0000 grade) steel wool. Tear off a small piece of the steel wool, soak it in the oil, and lightly wipe off all the surface rust. Do not use emery cloth; even the finest will remove the finish from the metal!
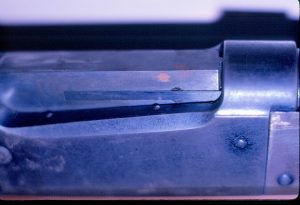
Dealing With Pitting
As you remove the rust, carefully inspect for signs of pitting in the metal. If you have light to moderate pitting you’ll need to get more serious. You can deal with pitting by sanding the barrel with various grits of emery cloth. Start with about a 150 grit and remove what you can. If you do this, it’s best to sand the entire barrel (except where the data stamp is), as you want an even finish in the end. Once done, switch to a 200 or 220 grit and repeat, then do it a third time with a 350 or 400 grit emery cloth. This should remove any pitting that you can do yourself. If there are still pits in the steel at this point you should consider taking it to a gunsmith, or simply living with them.
Cold Bluing as a Gun Restoration Technique
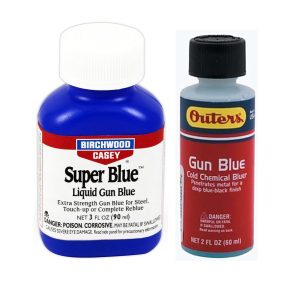
After all the imperfections have been removed to your satisfaction, it’s time to blue the parts. To cold blue your firearm, you will need: cold blue solution such as those made by Birchwood Casey, Shooter’s Choice or G96, latex or nitrile gloves, clean flannel patches, a clean dry rag, gun solvent or brake cleaner, and the cold bluing solution.
Put on your gloves (or a new pair if you wore a pair during the sanding process) and strip the metal of all sanding dust, oils and grease using the solvent, brake cleaner, or the degreaser included in the bluing package if it came with one. It is imperative that the surface of the metal be absolutely clean. Keep the solvent off your clothes. Once wiped down, make sure you do not touch the areas to be blued, especially with bare hands. The oils will come off your hands and fingers onto the metal and prevent the bluing from adhering properly and you will end up with fingerprint patterns on the metal.
Once the preparation is done, take the bluing solution, the flannel patches, the rag, and the metal parts over to the shop sink, laundry room or kitchen sink. Turn on the hot water and let it run until it is as hot as it can get; the hotter the better. Place the metal component to be blued under the water and let the water heat it up, or you can put the parts in the oven heated to about 200 degrees Fahrenheit. Do not heat the parts any hotter or you may end up overheating them and altering the metal’s temper (big trouble!). While your parts are heating up you can organize the flannel patches and soak them in the bluing solution. Remove the part from the water or oven (wear oven mitts or gloves if you heat in the oven), quickly dry it with the rag if necessary, and rub the bluing solution into the metal while the metal is still hot. The heat causes the metal to expand slightly and opens up the pores in the steel. This in turn allows the bluing to penetrate the metal to a greater degree, giving the metal a deeper, richer tone. Rub the solution in thoroughly using long (full length if possible) strokes. I find short or swirling strokes can sometimes leave a pattern on the metal. If it doesn’t darken enough repeat the process up to three times, rinsing the barrel in hot water and lightly wiping it clean and dry between coats (don’t buff it!). Remember never to touch the areas being blued with your fingers.
Once you are satisfied with the finish (or the metal won’t take any more of the blue) run cold water over the treated area. This closes up the pores again and fixes the blue to the metal. Wipe the piece dry and buff the area lightly with a clean, dry rag to shine up the finish. Finally, apply a light coat of gun oil as you would normally do. That’s all there is to it. Check out these videos to give you a better idea of the process: Metal Prep and Cold Bluing Rifle Barrels and How to Cold Blue a Rifle Barrel.
Professional Gun Restoration: Hot Bluing and Parkerizing
If you have serious pitting problems or a really messed-up finish on your action and barrel you may want to have it refinished by a professional gunsmith. If you have never had an old firearm professionally refinished you are in for a real treat. For around $150 a professional gunsmith will take your entire firearm, swivels and all, remove the pitting and refinish them in your choice of hot blue or parkerizing.
Hot Bluing is similar to the cold bluing process I just described, except, as the name implies, it is done in a heated bath. The metal parts are first stripped completely clean of grease, oil, and dirt. This is done by hand cleaning with solvent or bead blasting the parts with glass beads (similar to sandblasting, except easier on the metal).
Bead blasting leaves a matte finish on the metal. If you want a shiny gloss finish, the smith will polish all the parts after cleaning.
Once the finish is prepared, the parts go through several steps to a point where they are submerged into a bath of caustic bluing solution that is pre-heated to approximately 280 degrees Fahrenheit. Then they are cooled and buffed to a shine.
Bluing produces a deep, shiny blue finish, but it doesn’t last very long on parts that are constantly being rubbed or buffed, such as the bolt handle. Bluing is simply a coloring of the metal, not a protective coating, and after a few years the finish will wear off leaving bare metal. This is where parkerizing steps in.
Parkerizing: A Durable Gun Restoration Finish
Parkerizing is my preferred finish for a firearm. It is extremely durable, very pleasing to the eye, and its matte finish is non-reflective, thus being better for hunting. The military has used this finish for many years because of its durability. The old Lee Enfield .303 British and the American M1903 Springfield rifles from World War I were parkerized and if you find one unmodified you will probably find the finish still intact.
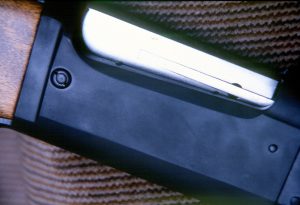
Parkerizing involves coating the metal with an oil-retaining, crystalline coating. The preparatory steps are the same as for bluing, but the parts are immersed in a hot bath (approx. 210 degrees Fahrenheit) of the crystalline solution for 15 minutes. The solution actually coats the parts with a fine layer of crystals that permanently adhere to the metal. The resulting finish is far tougher than bluing and has the advantage of retaining oil, which aids in rust prevention. If you have to get your firearm refinished professionally, I recommend you seriously consider parkerizing. One of the recognized experts in the industry is Turnbull Resotrzations.
To refinish a firearm’s metal components and mount them back into a beat-up stock seems to me to be a bit of a sacrilege. Stocks can be easily resurrected to absolute beauty in either a durable oil finish or a semi-hard sealed finish quite inexpensively, and is best done while you have the firearm stripped down for the metal refinishing. In the second part of this article, I will walk you through the rejuvenation of an old beat-up stock in just a few inexpensive steps.
Gun Restoration: The Wood Parts (Part II)
In the first part of this article I described how to breathe life back into your aging or mistreated old blunderbuss; in this part I will cover the steps needed to finish the job of restoring Betsy to a more reasonable facsimile of her old self.
To do a proper job of refurbishing you gun stock you will need a few more items on hand: paint stripper (Max Strip), a small paint scraper, lots of old newspaper, a two-inch wide natural fiber paintbrush, an old toothbrush, a small natural fiber scrub brush (like the old wooden fingernail brushes), raw linseed oil, clear flat, satin or gloss polyurethane spray (MinWax, Varathane or Krylon), paint thinner, a pair of old leather gloves, and some extra fine grit (140 or better) sandpaper. The reason I recommend natural fiber brushes and leather gloves is that the paint stripper is extremely caustic and will melt nylon and other synthetic or rubber compounds, thus ruining plastic bristle brushes and burning your hands.
Stripping Old Stock Finish
The first thing to do is remove all the extra little parts on your stock including sling swivels, butt plates, clamps, etc. Lay out the newspaper nice and thick on your workroom floor or workbench and open a couple of windows to the outside for good ventilation. You will need access to a sink or tap with running cold water as well. Once you have all the extra parts removed from the stock, put on your gloves, open up the stripper, and holding the stock vertical (muzzle end up) pour a small portion of the stripper onto the muzzle end, allowing it to run down the stock. Pick up the paintbrush and spread the stripper evenly over the whole front end of the stock, inside and out. Don’t skimp on the stripper and be sure not to let it dry. You should have an even coating that completely covers the finish over about half of the stock’s length and it should be thick enough to remain moist for at least a couple of minutes. If it looks like it is starting to dry, put more stripper on.
After a minute of two you may notice that the varnish on the stock is crinkling (some finishes don’t crinkle). Once this occurs, or after about three minutes, pick up the paint scraper and smoothly scrape off all the old varnish, allowing it to drop onto the newspaper. It doesn’t take much pressure to remove the old finish at this stage, so apply only light pressure or you may leave scraper tracks in the wood’s surface. Be careful not to get this stuff on your skin, it burns like crazy.
If you have checkering to deal with, take the small scrub brush and scrub the checkered areas in small circular motions while the stripper is still covering the checkering. Make sure to work the bristles into all the grooves. Do not try to use the scraper on the checkering; it will ruin it.
You can also coat the entire stock at once and wrap it in a plastic wrap like Saran Wrap, let it sit for a bit and then remove it and get the mess off as described above. I do it in two stages as I find it easier to handle when removing the old varnish and stripper.
Once all the old finish has been removed from the front of the stock, run the treated area under cold water and use your bare hands to remove all traces of the stripper. Use the old toothbrush to clean out the checkering. Try not to get any water on the untreated half of the stock. Once the treated section is clean, towel it dry and repeat the stripping process for the other half of the stock. When you are satisfied that all of the old finish has been removed, put the stock in a warm, dry place and allow it to dry overnight.
Sanding, Dent Repair, and Stock Prep in Gun Restoration
After the stock has thoroughly dried, examine it for dents. If there are any you may want to try to remove them using a medium grit sandpaper, but if they are real whoppers you will have to live with them or fill them with a high quality non-shrinking epoxy wood filler (good luck), and sand smooth. You will notice as well, that the water rinsing has lifted the tiny wood fibers up. This is a good thing. You want them raised so you can tell when you get a nice satin sand job done.
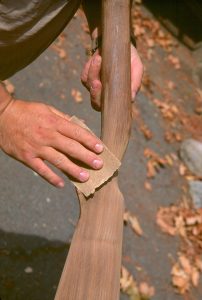
After you have finished sanding down the dents, or if you don’t have any dents to worry about, go over the entire stock with the extra fine grit sandpaper and give it a baby smooth finish. When done, wipe it down with a dry cloth and make sure you get all the dust off..
Choosing Your Stock Finish
You must now decide on what type of finish you want to end up with, oil or polyurethane, flat, satin or gloss. You must also decide if you want to change the color or tone of the stock with a wood stain as well. Dip your finger in the linseed oil and apply this small amount to the inside of the stock where the barrel seats itself. Rub it in well and have a good look at the tone and color. That is the color your stock will end up as unless you stain it. Staining is a simple procedure and I won’t delve into it here. If you decide to stain your stock now is the time to do it. Any quality wood stain will work, but I recommend the gel type over the liquid; it is a lot easier to work with and doesn’t streak.
Linseed Oil Base Coats
Regardless of whether you want an oil finish or a polyurethane finish, after you’ve completed staining the stock and have allowed the stain time to dry thoroughly, apply an even coat of linseed oil to the whole stock. Don’t use very much oil; I can’t stress this enough. It doesn’t dry like other oils and if the coat is too thick it will sit for months as a sticky mess, will never completely dry, and is a real problem to get off again. Pour a tiny amount into your palm (less than half a teaspoon), rub your palms together, and spread the oil evenly over the entire stock. Apply it with your bare hands and rub it in hard. You should feel the heat of friction as you work the oil in. If that amount doesn’t quite cover the stock, repeat the process. Apply only what the wood will absorb and then set it aside for about 5 minutes. After five minutes, wipe any excess off again. This is critical; get all the excess off! Then put it aside to dry overnight.
Oil-Finished Stocks
If you simply want an oil finish, you can apply successive coats of linseed oil once every other day over the next few days until the wood absorbs no more. When the wood won’t absorb the oil after the first few seconds of rubbing, wipe it all off with a clean rag and rub the stock well with clean, bare hands to ensure that the last of it gets worked in. At this point, your refinishing job is complete and you can set the stock aside to dry for a few days and then reassemble. You must remember that an oil finish requires regular upkeep to prevent swelling of the wood in the field, and that means regular applications of a light coat of raw linseed oil once or twice during the season as well as before each season.
Polyurethane Stock Finishes for Low-Maintenance
I prefer a flat polyurethane finish. It requires much less upkeep (maybe I’m lazy), and it ensures a waterproof finish that virtually negates swelling in the field. This type of finish is no more difficult than spray painting a piece of wood. As a matter of fact, that’s exactly what it is.
Once the first coat of raw linseed oil has been allowed to thoroughly dry (at least a couple of days after application, preferably a week), you can set up the stock to be sprayed. If the firearm has sling swivels take the screw from the fore stock swivel and screw it back in place about half way, enough to support the weight of the stock when hung from a piece of string. Screw in the lower butt plate screw about half way as well. You will find it handy for controlling the stock’s movements while you are trying to spray all sides of it evenly. If the gun doesn’t have sling swivels you can run a nail through the hole where the screw fixes the barrel to the stock. Make sure that the nail is narrower in diameter than the hole and the nail head is wide enough that the stock won’t slide off the nail. Get some string and hang the stock vertically from the ceiling about head height by tying the string around the swivel screw (or nail). Now you are ready to spray. Decide whether you want a glossy finish, satin or flat finish. After doing up several stocks in both finishes I prefer the flat finish; it doesn’t reflect light and allows more of the wood’s natural beauty to show through.
At this point you should stop for a second and remind yourself that you want to avoid runs at all costs. It would be a shame to get this far and ruin the finish now by over-spraying. Take hold of the butt plate screw and hold the stock so it doesn’t spin when you spray. Start spraying holding the can a bit too far away, about 24 inches, then close the distance until you get an even mist on the stock without building up too much of a coat. The idea is to spray in short bursts as you sweep the spray can up or down part of the stock. Never spray while the can is not moving or you will get too much polyurethane on one spot and it will run.

Spray until you have a light film over the entire stock. The first coat will hardly be visible. Allow the stock to hang free and let it dry overnight. The next day you can repeat the process and continue to add successive coats until you have a good solid coat of polyurethane over the entire stock. This will take three or four applications so be patient, you will be glad that you were when you see the final product.
Once the final coat is completely dry you will have a finish that will stand up to far more abuse than any varnish could ever take. The liquid plastic finishes like polyurethane are designed to remain semi-pliable and so can be bumped and bruised a lot more without cracking or chipping. Your finish will also be waterproof, which is a big advantage. All the finish needs at this point is a very light wipe from an oily rag (not linseed oil) and it will look like new for many years.
Final Thoughts on Gun Restoration and Traditions
If you are interested, here’s a pretty good video of the process.
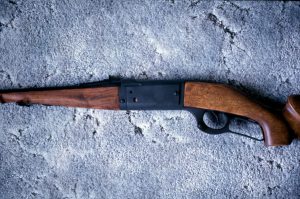
Old firearms carry with them hundreds of memories of past hunts, of successes and failures, good times and bad. I judge a firearm’s value by those memories, not by the price tag. The steps I have described here can restore your hunting companion to near-new condition and help keep it, and the memories, around for many years to come.
Per our affiliate disclosure, we may earn revenue from the products available on this page. To learn more about how we test gear, click here.